
Rock Saw Attachments: Rock saw attachments (also known as wheel saws or concrete saws) are heavy-duty skid steer tools designed to cut through very hard materials like rock, concrete, and reinforced pavement. They typically feature large diameter cutting wheels with industrial diamond segments or carbide teeth, allowing them to slice into tough substrates such as granite, concrete slabs, and even basal. Rock saws are built for demanding trenching and demolition tasks – for example, cutting narrow trenches in rock or concrete for utility lines, or scoring neat edges in roadways for curb installation. These attachments are engineered to withstand high torque and abrasion, often using robust planetary drive motors and reinforced frames to handle rocky soil and solid stone.
Asphalt Saw Attachments: Asphalt saw attachments (often called road saws or pavement saws) are a specialized subset of wheel saw designed primarily for cutting through asphalt road surfaces and other softer, abrasive materials. They excel at road maintenance tasks like slicing pavement for patch repairs, cutting expansion joints, and utility trenching in asphalt. Asphalt saws usually operate with slightly smaller blades or cutting wheels optimized for asphalt’s composition – the blades may use a hard-bond diamond segment (for abrasive asphalt) or replaceable carbide-tipped teeth that chew through asphalt and underlying base materials. Because asphalt is softer than solid rock or concrete, these attachments prioritize cutting speed and debris clearing, often including features like built-in side discharge chutes or augers to remove the asphalt spoil. In practice, there is considerable overlap: many wheel saw attachments are versatile enough to cut asphalt, concrete, and rock with the appropriate blade or tooth configuration. The key differences usually lie in scale and optimization – rock saws are larger and heavier for deep, hard cuts, whereas asphalt saws are tuned for quick pavement slicing and shallow trenching. Table 1 summarizes typical specification ranges for each type.
Typical Specifications and Performance Ranges
To understand the capabilities of rock saw vs. asphalt saw attachments, it’s useful to compare their typical technical specifications. Rock saw attachments for skid steers tend to be larger, heavier units built for maximum cutting depth and torque, while asphalt saw (pavement saw) attachments are often more compact, focusing on moderate cutting depth with high cutting speeds for road surfaces. Table 1 highlights common specs for each:
Table 1 – Typical Spec Ranges: Rock Saw vs. Asphalt Saw Attachments
| Specification | Asphalt/Pavement Saw Attachment (Typical) | Rock Saw Attachment (Typical) |
|---|---|---|
| Blade/Wheel Diameter | ~24–36 inches (smaller blade) | ~48–60 inches (large blade) |
| Maximum Cutting Depth | ~6–12 inches (e.g. ~9″ common) | ~18–24 inches (deep cut)t |
| Cutting Width | ~1.5–4.5 inches per pass | ~2.5–4+ inches per pass (up to ~6″ optional) |
| Hydraulic Flow Required | ~20–30 GPM (some standard-flow models) | ~30–45 GPM (high-flow system) |
| Hydraulic Pressure | ~2,800–3,500 PSI (operating) | ~2,500–3,000 PSI (operating) (often similar max up to ~5,000 PSI) |
| Attachment Weight | ~1,200–1,500 lbs (lighter) | ~1,800–2,400 lbs (very heavy) |
| Side-Shift Range | ~24–26 inches (offset reach) | ~24–26 inches (similar mechanism) |
| Typical Usage | Asphalt cutting, road repairs, shallow trenching | Rock, concrete cutting, deep utility trenching |
(
As shown above, a rock saw attachment might use a 4–5 foot diameter wheel to reach ~20+ inch depths, necessitating a high-flow hydraulic output (often 30 GPM or more at ~3000 PSI) to drive the larger blade. Asphalt saw units, in contrast, often max out around 9–10 inches depth using ~2–3 foot blades, and some can run on mid-size skid steers if a high-flow circuit is available (usually ≥25 GPM minimum). Both types typically feature a hydraulic side-shift of ~24 inches, allowing the cut to be offset from the loader’s centerline (useful for cutting close to curbs or walls). It’s important to note that these attachments are demanding in power and weight – the largest rock saws weigh over a ton and require a stout skid steer loader (usually a high-horsepower, high-flow model) to operate effectively. Many also require a case drain line to return low-pressure fluid to tank, due to the high hydraulic flow and heat generated.
Use Cases and Applications
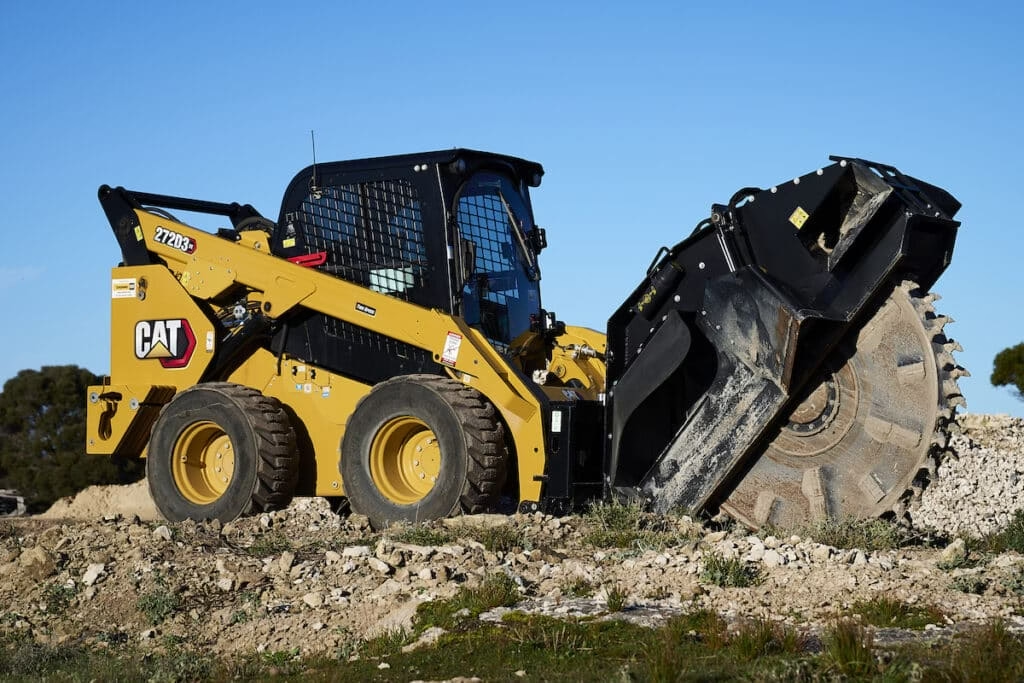
A skid steer rock saw attachment cutting a trench through compacted soil and rock. The protective shroud directs excavated material (spoil) to the side as the wheel saw cuts forward.
Utility Trenching: One of the primary uses for these saw attachments is cutting narrow trenches for utility lines (water, electric, fiber optic, etc.) through hard ground or pavement. Rock saw attachments are especially valued for trenching in solid rock or heavily compacted roadbeds where chain trenchers or backhoes struggle. They can cut clean, straight trenches in asphalt or concrete roads to access utilities beneathcat.com. For example, a rock saw can slice through a concrete street and underlying rocky soil to create a trench for pipes or cables, achieving a neat cut that facilitates easy backfilling. Asphalt saw attachments are likewise used by utility contractors to cut through asphalt pavement for installing or repairing buried lines – they leave a precise trench outline with minimal damage to the surrounding road surface.
Road Repair and Maintenance: Asphalt saw attachments excel at road maintenance tasks. They are commonly used for asphalt patch cutting, where a section of damaged roadway is cut out in a square or rectangular shape for repair. The saw produces straight, vertical cuts through the asphalt layer, allowing the damaged section to be removed cleanly and new asphalt to be patched in. These attachments are also handy for cutting expansion joints or relief cuts in pavement. Rock saws (with the appropriate blade) can be used in roadwork as well – for instance, cutting contraction joints in concrete slabs or slicing along the edge of a roadway to install concrete curbs. In demolition or road teardown projects, a rock saw can cut reinforced concrete into manageable sections.
Demolition and Construction Cuts: In the construction and demolition field, skid steer saw attachments provide a method to make controlled cuts in concrete structures or rock outcrops. A rock saw attachment can be used to cut precise openings in concrete walls or floors, such as enlarging a doorway or creating a cut line in a slab before demolition. This precision is valuable to avoid overbreaking – the saw cut defines a clean edge. Similarly, these saws can cut through rock or boulders in site preparation, or segment large concrete chunks for removal. Their ability to cut flush edges is also useful when removing sections of sidewalks or driveways without disturbing adjacent areas. Asphalt saws are occasionally used in demolition for cutting softer masonry or asphalt surfaces before removal. However, for thick concrete or hard rock, the heavy-duty rock saw (diamond blade) is preferred due to its superior cutting ability in hard materials
Specialized Applications: Other use cases include landscaping and quarry work – for example, using a diamond rock saw to cut natural stone blocks or boulders with precision (for rock walls or landscape features). In agricultural or rural settings, a rock saw on a skid steer can cut shallow trenches for irrigation lines or cut tree roots and stumps (though stump grinder attachments are more common, a wheel saw can sever large roots in a trenching context). Both rock and asphalt saw attachments provide a more precise alternative to impact breakers in certain jobs: rather than hammering or jackhammering a trench (which can crack surrounding material), the wheel saw neatly saws through, reducing collateral damage. This precision is why wheel saw attachments are considered ideal for any project requiring clean, accurate cuts through pavement or rock, such as scoring a roadway prior to excavation, or cutting a trench in a factory floor for new plumbing lines.
Compatibility with Skid Steer Models and Hydraulic Requirements
Using a rock or asphalt saw attachment places significant demands on the skid steer loader. Compatibility comes down to the loader’s hydraulic capacity, physical size, and auxiliary features:
- Hydraulic Flow & Pressure: Both attachment types need strong hydraulic power. Most rock saws and high-performance asphalt saws are designed for skid steers equipped with high-flow auxiliary hydraulics. High-flow systems (commonly ~26–40 GPM) are needed to spin the large cutting wheel under load. For instance, a heavy rock saw might require 30–40 GPM at 2500–3000 PSI to operate effectivelywhereas a smaller pavement saw could have a minimum flow requirement around 22–25 GPM (with 40 GPM as a max for peak performance). Standard-flow skid steers (typically 15–23 GPM) usually cannot drive these saws at full capacity – attempting to run a large saw on insufficient flow will result in stalling or very slow cutting. In addition to flow, adequate hydraulic pressure (PSI) is necessary; most units expect around 3,000 PSI from the auxiliary circuit, with some motors rated up to ~5,000 PSI peak. The skid steer’s hydraulic system must be in good condition to maintain high pressure under load.
- Case Drain Requirement: Due to the high hydraulic speeds and heat generated, many wheel saw attachments require a third hydraulic line called a case drain (or return line). This is a low-pressure line that returns hydraulic motor leakage and surges directly back to the tank, preventing pressure build-up in the motor case. Skid steer models outfitted for high-flow often include a case drain hookup, but users must verify this. Operating a saw that specifies a case drain without one can blow out motor seals. For example, the Spartan/Bradco rock saw requires a case drain line to be connected along with the pressure and return hoses. Ensure your loader has this third line available if the attachment calls for it.
- Physical Size & Mounting: The skid steer must be physically capable of carrying and handling the attachment. Rock saw attachments can weigh on the order of 1,800–2,400 lbs (plus the weight of the cutting wheel). This would overwhelm a small-frame skid steer; generally, only mid to large-frame skid steers (with sufficient operating capacity and counterweight) should carry these heavy saws. Always check the attachment weight against the loader’s lift capacity. The mounting is usually via the universal quick-attach plate, which all modern skid steers have, so fitting the attachment is straightforward – but the machine needs enough counterbalance to remain stable when the saw is extended and cutting. When trench-cutting, the down-force and side forces are substantial, so a heavier, sturdier loader (often a tracked skid steer for better traction) is preferred. Tracked skid steers (compact track loaders) generally provide better stability and control for saw attachments, because the long track contact patch keeps the machine steady and reduces bouncing during cutting. Wheeled skid steers can certainly be used, but the operator must ensure all four tires stay firmly on the ground for optimal traction and stability while cutting
- Cooling Capacity: Continuously cutting rock or asphalt generates heat in the hydraulic system. High-flow skid steers usually come with improved hydraulic coolers – verify that your machine’s cooling system is adequate, especially on hot days or with prolonged cutting. Some attachment manufacturers note that running at high flow for extended periods can overheat hydraulic fluid if the loader’s cooling is marginal. If available, consider using a machine with a cooling package or taking breaks to avoid overheating.
- Electrical Controls: Many modern wheel saw attachments come with electro-hydraulic controls for certain functions (like hydraulic side-shift or depth adjustment) that plug into the skid steer’s 14-pin or similar electrical connector. Ensure your skid steer is outfitted with the required electrical output and that the controls in the cab are compatible. If not, the attachment may be supplied with a control box to run those functions. (For example, a control box might be included to toggle the side-shift cylinder if the machine lacks an integrated switch
In summary, check the skid steer’s specs against the attachment’s requirements before attempting to use a rock or asphalt saw. A general rule is that these attachments pair best with high-flow skid steers in the 75+ hp range, which have the hydraulic power and weight to handle the job. Always consult the attachment manual for the specific GPM, PSI, and any additional hookups needed, and confirm your loader meets those needs. Using an undersized machine can be dangerous and will likely result in poor performance or equipment damage.
Key Components and Design Features of the Attachments
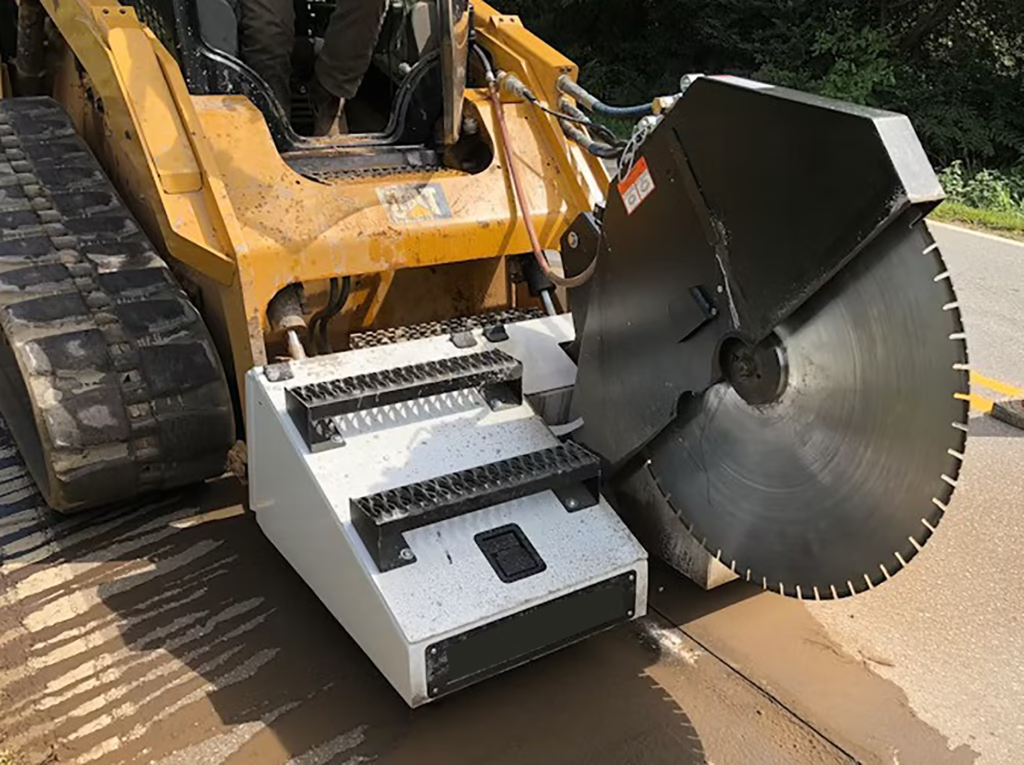
Close-up of a skid steer wheel saw attachment (road saw type). Key components visible include the heavy-duty cutting wheel with carbide teeth (partially visible behind guard), the hydraulic drive motor (center, with multiple hoses), and the depth control cylinder (vertical bar) for raising/lowering the wheel. Protective hose sleeves and a rugged frame protect components from flying debris.
Both rock saw and asphalt saw skid steer attachments share a common design DNA. They typically consist of a powered cutting wheel mounted within a heavy protective housing, plus mechanisms to control cutting depth and position. Below are the key components and their functions:
- Cutting Wheel (Saw Blade): This is the business end of the attachment – a large diameter circular blade or wheel that actually cuts the material. On rock saw attachments, the wheel often has industrial diamond segments around its perimeter (similar to a concrete saw blade) to grind through hard rock and concrete. Some designs use replaceable tungsten-carbide teeth or picks instead, especially for wheel saws intended for asphalt and softer rock. For example, one high-flow road saw features 28–36 carbide-tipped teeth on its wheel, depending on width. The wheel’s size dictates cut depth (larger diameter reaches deeper). Common blade diameters range from ~24″ on small pavement saws up to 48–60″ on big rock saws. The wheel is partially enclosed in a steel guard housing that covers the top portion – this protects the operator and machine from debris, and often serves to funnel excavated material out to one side. The cutting width of the wheel is determined by the blade thickness or the width of the tooth pattern (typical trench widths are on the order of 2–6 inches). Blades can often be swapped out: for instance, you might install a narrower wheel for cable trenching or a wider wheel for pipe trenching.
- Hydraulic Drive Motor and Gearbox: The cutting wheel is powered by a high-torque hydraulic motor mounted on the attachment. In many designs, a planetary gearbox is used between the motor and blade to multiply torque and slow the blade’s rpm for optimal cutting power. This allows the wheel to maintain cutting force even in hard materials. The motor receives flow from the skid steer’s auxiliary hydraulics; rock saw motors are typically high-displacement for torque, with pressure ratings often 3,000 PSI and above. Given the forces involved, the drive mechanism is heavily built – steel housings, large bearings, and sometimes dual support mounts for the wheel axle. Some attachments drive the wheel centrally (axial drive), while others use a rim-drive or offset drive to achieve greater depth (by not having a large central hub in the way). Regardless of configuration, keeping this motor/gear drive cool and lubricated is vital. Many units have a dedicated oil bath or grease-filled gearbox for the gears, and some include cooling fins or recommend periodic cooldown intervals during operation. The drive motor is usually shielded by guards to prevent damage from flying rocks.
- Depth Control System: A critical feature is the ability to raise and lower the cutting wheel to control cutting depth. Attachments accomplish this via a hinged mounting arm and a hydraulic cylinder (or cylinders). The cylinder is controlled by the operator (often through an electro-hydraulic switch) to plunge the saw into the material or lift it out. Depth indicators are usually provided (like marked positions or electronic readouts) so the operator knows how deep the cut is. Many designs also incorporate a form of ground guide or skid shoe: for example, a small front roller or skid plate that rides on the ground and supports the attachment at a set depth. This helps maintain a consistent cut depth and takes some load off the arm. Proper use of the depth control cylinder allows for “plunge cutting” at the start of a trench – the operator lowers the spinning blade slowly into the surface until reaching the target depth, then proceeds forward. Having precise depth control is important for avoiding utility hits when trenching and for achieving uniform depth along the cut’s length.
- Side-Shift Mechanism: Most skid steer saw attachments include a side-shift or traversing ability, which means the entire saw frame can slide laterally relative to the skid steer mount. This is typically a hydraulic side-shift powered by a small cylinder, offering around 24–26 inches of travel. Side-shift allows the operator to offset the cutting wheel to one side of the loader’s centerline. The benefit is being able to cut close to structures or obstacles: for instance, you can cut alongside a curb or building without the skid steer’s wheels needing to be directly over the cut line. It also enables cutting on either side of the loader by shifting left or right. Operationally, an attachment might have a default center position and then ~2 feet of shift to the right (many are designed to shift mostly to one side). The side-shift mechanism is built with heavy rails or tubes and slide pads to carry the weight. It’s important to only actuate side-shift when the saw is out of the cut (raised), to avoid damage – manufacturers warn that sliding the saw while in contact with the ground or material can shear the mechanism. Once positioned, the saw is locked in place and cutting can resume at the new offset.
- Protective Guards and Shields: Safety shielding is extensive on these attachments. A robust blade guard encases the top and sides of the wheel, preventing accidental contact and containing most of the debris and dust generated. Often, there’s an adjustable front shield or flap that can be raised for access and lowered during operation to fully enclose the cutting area. Many models include a trailing spoil deflector or chute that channels the excavated material (especially for trenching – it directs chunks and dust to the side of the trench). There are also shields for hydraulic components – for example, steel plates or tubing that protect hoses, valves, and the motor from impact. Some attachments feature guarding over the top of the saw frame to stop larger debris. In addition, bright safety decals are placed on the guard warning of the rotating blade hazard. Never remove or disable these protective guards; they are crucial for safe operation. The housing also helps suppress dust to some degree, though additional dust control may be needed (see Safety section).
- Auxiliary Features: Depending on the model, there may be other components such as a trench cleaner (some wheel saws have an integrated small scraper that drags the trench bottom to clear remaining debris), or an optional water injection kit. Water kits allow hooking up a water supply to spray on the blade during cutting – this helps to control dust (especially silica dust when cutting concrete) and cool the blade, extending its life. For example, Blue Diamond’s road saw offers a water tank kit for dust suppression. There may also be parking stands or support legs for storing the attachment when not in use, and lifting eyes or brackets on the frame for hoisting the heavy unit safely. Finally, the attachment will have the standardized quick-attach mounting plate (making it easy to connect to any skid steer), and typically flat-face hydraulic couplers for the pressure/return (and a case drain coupling if required).
Understanding these components helps the operator in daily use – e.g., knowing how to adjust depth or side position, recognizing the need to keep guards in place, and being aware of where the hydraulic motor and hoses are so they can be protected. The design of rock and asphalt saw attachments is all about delivering a controlled, powerful cut while managing the significant forces and debris that result.
Operational Best Practices: Cutting Rock vs. Cutting Asphalt
Operating a skid steer saw attachment requires skill and caution. While both rock and asphalt cutting involve similar principles, there are differences in technique and considerations for each material. Below are best practices to ensure efficient, safe operation and to prolong the life of your equipment:
1. Pre-Work Checks and Setup: Before cutting, perform a thorough inspection and setup: verify the correct blade or wheel is installed for the material (e.g. use a diamond blade rated for rock/concrete when cutting those, and an asphalt-optimized blade or teeth for asphalt, as they have different hardness and wear characteristics). Ensure all bolts (especially the blade mounting bolts or lug nuts) are tight, and that the hydraulic connections are secure. Clear the area of bystanders and obstructions. Mark the cut line clearly (with chalk or paint) on the surface so you can follow a straight path. If cutting in a sensitive area, consider doing a shallow pilot cut or using a guide to ensure accuracy. For trench cuts, call utility locators (e.g. call “811” in the US) to mark any underground utilities – never assume the area is clear, especially when cutting deeper trenches. Position the skid steer on level ground aligned with the intended cut; never attempt to cut on a steep slope or uneven terrain that could destabilize the machine
2. Cutting Asphalt – Technique: Asphalt is relatively soft and can be cut at full depth in many cases. When cutting asphalt pavement, it’s often best to plunge to the full desired depth relatively quickly and then move forward steadily. Asphalt saw attachments with carbide teeth will grind out the material and create gravelly spoil; diamond blades will produce an asphalt slurry or dust. Travel speed can be faster in asphalt than in rock – experienced operators listen to the hydraulic motor: a steady motor pitch means the blade is maintaining RPM. If the engine or motor bogs down, slow your forward travel to let the wheel catch up. Asphalt can sometimes become gummy when hot (especially in warm weather), so if using a diamond blade, water cooling can help prevent the asphalt from sticking to the blade segments. Try to cut during cooler parts of the day, or take breaks if you smell burning bitumen (excessive heat can glaze the blade). For long straight cuts (such as scoring a road lane), keep the skid steer very straight; any side-to-side swaying can cause the blade to bind or the cut to wander. It’s recommended to cut the full line in one pass if possible. Should you need to make a wider trench than one blade width, cut the first line completely, then make a second parallel cut for the adjacent line rather than trying to oscillate in one pass. When nearing the end of a cut, ease up on forward speed to avoid lurching out of the cut. Asphalt usually doesn’t require multiple passes at increasing depths (unlike concrete) unless it’s particularly thick or layered; one good pass per line is sufficient for clean edges.
3. Cutting Rock or Concrete – Technique: Hard rock and concrete require a more gradual approach. Multiple passes may be necessary if the material thickness is greater than the blade can handle easily, or if the machine is straining. For example, to cut a 18″ deep trench in solid rock, an operator might do an initial cut at half-depth (~9″), then reverse out, let the motor recover, and do a second pass to full depth. Even if the attachment is rated for full depth in one go, reducing depth in initial passes can reduce wear and heat. Start the cut by going slow and steady: lower the saw into the rock at low RPM and allow a shallow groove to form. This initial groove will guide the blade and reduce chatter. Once the groove is established, advance deeper. Monitor the skid steer’s pressure gauge (if available) or listen to the engine – if you hear the hydraulic relief frequently (whining noise indicating max pressure) or the blade rotation slowing significantly, you’re pressing too hard. Reduce travel speed or back off slightly on depth to prevent stalling. In very hard aggregate or reinforced concrete, progress will be slow; patience is key to avoid overheating the hydraulic motor or glazing the diamond segments. Using water to cool and suppress dust is highly advisable when cutting concrete or rock – silica dust is hazardous (see Safety), and water will also keep the blade from overheating, preserving its life. Some operators rig a simple garden hose or a water tank with gravity feed to trickle water at the cut. Make sure the water does not cause the work area to become dangerously slick for the skid steer’s tires or tracks. If cutting reinforced concrete (rebar), be aware that hitting large rebar can cause sparks and extra resistance – a diamond blade will cut through rebar, but carbide teeth may struggle or wear quickly if they strike metal. In such cases, proceed slowly and expect some vibration or jerking when metal is encountered. It’s often best to avoid cutting through large steel objects if possible (locate rebar and plan cuts to miss them, or use a different tool to finish that section).
4. General Operating Tips (All Materials): Always run the saw at full recommended RPM once engaged in the cut – the hydraulic flow (GPM) should be at the specified level for optimal speed (often this means running the skid steer at near full throttle while the aux hydraulics are on). Do not feather the throttle during cutting; keep it consistent so the wheel maintains momentum. However, when initiating the cut, some manuals suggest starting the hydraulic flow at low engine idle to avoid a sudden shock load, then throttling up once the blade contacts the material. Maintain a firm, steady forward motion; do not jerk or randomly accelerate. If the cutter head begins to stall or bog down, stop forward travel immediately and let the wheel spin freely to clear debris and regain speed. Trying to force through a stall can jam the saw or damage the motor. It’s better to make slower, continuous progress than to stop and start frequently. Also, avoid turning the skid steer while the blade is in the cut – the wheel saw is not meant to pivot within a cut and doing so can damage the blade or cause it to bind aggressively. To change direction or follow a curved trench line, raise the saw completely out of the cut, reposition the machine, then plunge again on the new line. Use the side-shift feature to line up subsequent cuts or to compensate if the machine can’t travel exactly where needed (for instance, if you must keep one set of tires on solid ground while cutting near an edge). When cutting is complete or you need to pause, raise the saw and disengage the hydraulics before reversing or turning. Never drive around with the saw spinning freely in the air – it should only be running when engaged in a cut or when momentarily test-spinning to clear debris. Finally, plan the sequence of cuts smartly: if you need to make multiple cuts (like a square patch), cut the straight lines in such an order that you don’t box yourself in with the skid steer’s position. Often, cutting the far side line first and ending with the near side line is easier, to keep the machine from driving over any partially cut sections.
5. Managing Debris and Visibility: Cutting pavement or rock generates a lot of debris – crushed rock, dust, and chunks. The attachment’s guard will channel much of this to the side of the trench, but it’s still important to watch for build-up. If a large heap of spoil starts to pile in front of the saw or under the machine, stop and clear it (with the bucket or by moving the machine) because driving the saw through a pile of debris can put extra load on it or cause you to lose depth accuracy. Maintain visibility of the cut line: dust can obscure your marks. Using water or having a spotter with a clear line of sight can help. In enclosed areas, dust can also coat the skid steer windshield – running the AC fan or an overpressure system in enclosed cabs helps keep dust out; you might also periodically need to wipe the glass. If your attachment has a trench cleaner (a little scraper), use it – engage it so that it scrapes out the bottom of the trench as you move. This prevents leftover ridges and can speed up the work (less manual clean-out later). For long cuts, periodically stop, lift the saw and inspect the blade and the trench to ensure everything is going well (no signs of blade segment loss, and the trench is clearing properly).
6. Post-Cutting Procedure: Once a cut or trench is finished, reverse the skid steer out carefully (if in a trench, back straight out to avoid bumping the sides). Raise the saw out of the ground, let the blade spin down, and then turn off the hydraulic flow. It’s good practice to let the motor cool by idling for a minute after heavy cutting, circulating fluid without load. If the attachment has been running hot, do not touch the blade or motor immediately – they can be extremely hot (carbide picks in particular can cause burns after operation). Set the attachment down on the ground or on its stands before shutting off the skid steer. If you need to move the machine a long distance, remove the saw attachment (rather than driving a long way with it attached and potentially swinging).
Following these best practices will lead to smoother cuts, reduced wear on the equipment, and a safer operation. Different jobs might require slight adjustments in technique, but the overarching principle is to let the saw do the work at its own pace – forcing it faster than it can cut will only cause problems. With experience, an operator will get a feel for the optimal feed speed by listening to the machine and watching the material removal rate.
Safety Protocols for Wheel Saw Operation
Operating a rock or asphalt saw attachment involves significant hazards – a spinning cutter wheel, flying debris, heavy machinery, and even dust and noise concerns. Strict safety protocols must be followed to protect both the operator and others on the job site:
- Personal Protective Equipment (PPE): Full PPE is non-negotiable. Operators should wear eye protection (impact-rated safety glasses or preferably a face shield) to guard against chips and dust. A hard hat is recommended, especially on construction sites. Hearing protection is a must – cutting operations are loud, both from the skid steer engine at high throttle and the cutting noise; exposure can easily exceed safe decibel levels. If cutting dry concrete or rock, a respirator (N95 minimum, or P100 respirator for silica dust) is critical to avoid inhaling crystalline silica from the dust. Asphalt cutting also produces dust and fumes – while asphalt doesn’t have silica like concrete, it can emit noxious fumes when hot, so some respiratory protection is still advised. Wear sturdy work gloves (vibration-resistant gloves can help if you’re experiencing a lot of vibration through the controls). High-visibility clothing is a good idea if working near traffic. Never wear loose clothing or dangly jewelry that could get caught, and tie back long hair.
- Machine and Attachment Inspection: Before starting, double-check that all shields, guards, and covers are in place on the attachment. All safety decals should be present and legible; they often provide reminders of hazards (like “Keep hands clear – rotating blades”). Ensure the skid steer’s cab door (if equipped) is closed during operation to provide a barrier from ejected debris. Check the attachment mounting latch – it must be fully locked on the quick-attach plate (failure to latch properly could cause the heavy saw to drop off mid-operation). Verify the hydraulic couplers are locked and not leaking. Inspect hoses for any damage – a burst hydraulic line under pressure can be dangerous (fluid injection injury). If you find any defect (e.g., cracked blade, loose teeth, oil leak, inoperative controls), do not operate until repaired. It’s wise to have a fire extinguisher accessible, as cutting metal (rebar) or hitting certain rocks can occasionally throw sparks into dry material.
- Site Safety and Exclusion Zone: Absolutely keep all bystanders well away from the work area. These saws can fling rocks and debris at high velocity. A general rule is to establish a clear safety radius (e.g. 50 feet or more) where no one should be standing in line with the direction the saw is cutting and discharging. The Erskine pavement saw manual, for example, warns to keep people away from the loader, attachment, and the discharge area when in use. Use barricades or spotters if necessary to keep others out. If working near traffic or in a public road, proper traffic control (cones, flaggers, warning signs) must be in place – sudden debris or the presence of the machine can be hazardous to passing vehicles. Also be mindful of the skid steer’s movement; maintain a clear perimeter in case the machine needs to maneuver or back up. If you have to leave the operator seat for any reason, first lower the attachment to the ground, shut off the hydraulic flow, turn off the engine, and remove the ignition key – only then exit the cab. Never leave the skid steer with the saw raised or running unattended.
- Avoiding Underground and Overhead Hazards: When trenching, the saw will cut through whatever is in its path – including underground utilities. Always have utilities located and marked beforehand. Despite precautions, if you strike something unexpected (like an old pipe or wire), stop and assess immediately. For electrical lines, this is a severe emergency – cease work and follow lock-out/tag-out procedures for power. Also be cautious of overhead hazards when operating or transporting the attachment on the loader – the attachment itself is low, but the loader arms when raised could contact power lines or overhead structures if one is not aware. Plan the work such that you are not cutting in proximity to known gas lines, electrical vaults, or other sensitive installations; if it’s unavoidable, consider alternate methods that give more control (like shallow cuts and finish by hand tools around the object).
- Operational Safety: Only operate the saw from the skid steer’s operator seat with the seatbelt on (or lap bar down) – never allow anyone to approach the attachment while it’s running. Do not attempt to clear jams or move debris from the blade while the engine is running or the blade is rotating. In fact, even after hydraulic power is cut, the wheel can spin for a short time due to inertia – always wait for full stop. Manufacturers warn to never place hands, feet, or any tools in the discharge chute or near the blade area while the engine is running. If you need to clear debris, shut everything down and use a stick or tool, not your hands, to dislodge material. Be aware of the potential for the skid steer to lunge or lurch when the saw contacts a hard object; keep a firm grip on the controls. Use the creep mode or a steady pedal to avoid sudden surges. Importantly, never operate on an incline or embankment where stability is uncertain – the combination of a heavy side-mounted saw and uneven ground could lead to a rollover. Plan to cut on flat ground whenever possible. If you must cut on a slight grade, work uphill if feasible (so the saw is not on the downhill side pulling the machine off-balance) and go very slowly, with a spotter watching stability.
- Dust and Flying Debris: As mentioned, cutting concrete and rock releases silica dust, which is a serious long-term health hazard if inhaled. Wet cutting (with water) is the best control; if not possible, a dust vacuum or extraction system should be used, or at minimum the operator must wear a respirator. Be aware of local regulations – OSHA and other agencies have rules limiting silica exposure, and using a wheel saw likely falls under those guidelines if dry-cutting concrete or masonry. Flying fragments are also a hazard – even small stones can become projectiles. The attachment’s guards mitigate this, but not 100%. Therefore, in addition to keeping people away, the operator should angle the machine (when possible) so that the discharge is directed away from any sensitive areas (cars, windows, etc.). Some wheel saws allow changing the discharge side or adding extra shielding – use those features if available, to protect nearby property. Never position yourself or others in line with the spinning blade, even with guards present – a blade failure (while rare) could eject pieces. Always assume something could come out and maintain a safe orientation.
- Hydraulic Safety: The skid steer’s hydraulic system under high-flow produces a lot of pressure. A leak can inject oil into your skin, which is a grave medical emergency (it requires immediate surgery). Regularly inspect hoses for wear, and never check for leaks with your bare hand – use cardboard or wood to pass near a suspected leak to see if it gets wet. Relieve pressure before disconnecting hoses (shut off engine, move controls, etc.). Additionally, the hydraulic motor and hoses can become very hot after usage; let the attachment cool before touching or maintenance. If any hydraulic fitting bursts during operation, stop immediately, lower the attachment, and address it – do not continue working with oil spraying or leaking.
- Emergency Preparedness: Have a plan for emergencies. The skid steer should be equipped with a functioning fire extinguisher in the cab. A first aid kit should be on site. Operators should know how to quickly shut down the machine if something goes wrong (e.g., hydraulic hose burst, blade jam causing machine to buck, etc.). If the attachment binds and causes the machine to tip or lift (it can happen if the blade sticks in a cut), the operator should lower the arms (if possible) to stabilize and then power down. Do not try to exit a tipping skid steer – ride it out, as jumping can be more dangerous. Instead, lowering the attachment to the ground can sometimes prevent a tip. After any incident or near-miss, inspect the equipment thoroughly before restarting.
To sum up, safety when using rock or asphalt saw attachments comes down to respecting the power of the equipment. Train all operators on the specific attachment before use – ensure they’ve read the manual and understand all warnings. The combination of a high-speed rotary blade and the force of a skid steer means mistakes can be catastrophic. But with proper precautions – PPE, maintaining exclusion zones, using guards, and following procedures – these attachments can be used safely and effectively. Always err on the side of caution: if unsure, stop and evaluate rather than pushing ahead unsafely.
Maintenance Routines and Care
Routine maintenance of rock and asphalt saw attachments is essential for performance and longevity. Given the harsh working conditions (abrasive dust, high forces, vibration), a regular maintenance schedule will prevent breakdowns and unsafe situations. Below is a comprehensive maintenance routine:
- Daily Inspection and Cleaning: After each use (or daily, if in continuous use), thoroughly inspect the attachment. Clean off all debris – concrete dust, asphalt chunks, mud, etc. Use a pressure washer or compressed air if available (but avoid directly blasting high-pressure water at seals or bearings). Pay special attention to the blade guard housing – material buildup inside can harden (especially asphalt or concrete slurry) and should be removed. Check the cutting wheel condition: look for any damaged or missing teeth/segments. For carbide-tooth wheels, ensure each pick is still sharp and able to rotate in its holder (many picks are designed to spin freely to self-sharpen evenly; if they’re jammed, free them or replace). For diamond blades, look for cracking at the segment welds or excessive wear; if segments are nearly worn down or any are missing, the blade should be re-tipped or replaced. Also verify the blade mounting bolts (or hub nuts) are tight – the intense vibration can loosen hardware over time.
- Lubrication: Grease any fittings daily. Common grease points are the side-shift slide rails or pins, pivot points on the depth control arm, and sometimes the bearings on the guide rollers or support skids. If the unit has a planetary gearbox, check the oil level per the manual’s interval (often daily or every 8 hours of operation). Gearboxes usually have a fill plug; ensure oil is at proper level and not contaminated. Change gearbox oil at the interval specified (e.g. every 100 or 250 hours). Also grease the drive motor’s output shaft bearing if there is a zerk. A well-lubricated machine not only runs smoother but also avoids catastrophic failures of pins or gear drives.
- Hydraulic System Checks: Each day, inspect all hydraulic hoses for chafing or leaks. Tighten any loose fittings (with the system depressurized!). Look for oil leaks inside the housing around the motor – shaft seals can start leaking and would need repair if so. The auxiliary couplers should be kept clean; wipe dirt from them before connecting or after use, and use protective caps. Also examine the case drain line (if present) for any kinks or blockage. If the attachment has a filter (some have in-line filters on hydraulic lines), inspect or replace it per the maintenance schedule. After heavy use, also inspect the skid steer’s hydraulic oil – cutting puts heat in the system, so ensure the oil hasn’t degraded (follow the skid steer’s hydraulic oil change intervals and keep the cooling system clean).
- Wear Parts Replacement: Some components are considered wear items and will need periodic replacement. Cutting teeth (picks) on asphalt/rock saws fall in this category – keep spares on hand. If the wheel has, say, 40 teeth, inspect them individually. Replace any teeth that are cracked, chipped, or worn past their effective carbide tip. It’s often recommended to rotate the positions of picks if uneven wear is noticed, to promote uniform wear. When replacing teeth, follow the manufacturer’s instructions (usually using a special pick puller tool to remove and a press or hammer to install new ones). For diamond blades, if used heavily, they may need to be sent for re-tipping or replaced once the segment height is low. Never run a blade with missing segments as it can unbalance and cause further damage. Side-shift pads or slides can also wear – check if any gib plates or wear blocks are adjustable or need flipping/replacing to take up slack. Keep an eye on the skid shoes or guide rollers (if the unit has sacrificial skid plates, these should be replaced when thinned out to ensure proper depth control and to avoid uneven cutting).
- Fasteners and Decals: Go around and torque-check critical bolts regularly. This includes the blade mounting bolts, any large bolts securing the frame or motor, and the bolts holding cylinders in place. Vibrations can loosen them over time. Consult the manual for proper torque specs (often provided in a chart). Replace any missing or damaged safety decals – they are there for a reason, and a missing decal could mean someone operating the machine isn’t aware of a hazard. Most manufacturers will provide replacement decals.
- Storage and Handling: When not in use, store the attachment in a dry, secure area. Whenever you detach it from the skid steer, ideally set it down on wooden blocks or its stands such that the blade is not touching the ground (this prevents the blade from warping or teeth from resting on the ground). For long-term storage, consider coating the blade with a light oil to prevent rust, especially if it’s a steel-tooth wheel. Protect the attachment from rain (to preserve the hydraulic components and gearbox). Also, keep the attachment’s electrical connectors (if any) covered and dry to avoid corrosion.
- Functional Testing: Before starting a new job, do a quick functional test in a safe open area: attach the saw, lock it in, run the hydraulics at low speed to see that the blade spins without unusual vibration, test the side-shift and depth cylinders for smooth operation, and listen for any abnormal noises (grinding, knocking could indicate a gearbox or bearing issue). If something sounds off, investigate before subjecting it to load. It’s easier to fix a loose chain or bad bearing in the yard than in the middle of a cut.
- Blade Sharpening/Conditioning: In the case of diamond blades, if you notice it’s not cutting as well (which can happen if the segments glaze over from cutting very hard material without enough abrasiveness), you might need to dress the blade. This is done by making a few cuts into an abrasive material (like a cinder block or asphalt) to expose fresh diamonds. Follow manufacturer guidance on this – it can greatly improve cutting performance if the blade was glazed. Carbide teeth generally self-sharpen to a degree (the rotating picks), but if they glaze (from cutting something too soft), a light touch on a grinding stone can renew an edge – remove the pick to do this safely, of course.
- Record Keeping: Maintain a log of hours used and maintenance performed on the attachment. Much like one would for the skid steer itself, having a record ensures you do oil changes, tooth replacements, etc., at recommended intervals. It also helps with warranty claims if any (some attachments have warranties that require proof of maintenance). For example, if the manufacturer calls for checking gearbox oil every 50 hours and changing at 500 hours, note those in the log.
By adhering to these maintenance routines, you will greatly extend the life of your rock/asphalt saw attachment and maintain its performance. More importantly, you’ll ensure it operates safely. A poorly maintained saw could fail in operation – e.g., a cracked blade might come apart, or a seized pick could result in uneven cutting and kickback. Thus, maintenance is a safety practice as much as it is a performance one. If any serious issues are found (like structural cracks in the frame or guard, leaking motor, etc.), take the attachment out of service until properly repaired. Many heavy attachment dealers or manufacturers have service centers that can rebuild motors or gearboxes, replace bearings, and so forth. Staying on top of the small stuff prevents those big repairs.
Selecting the Right Attachment for the Job and Machine
Choosing between a rock saw attachment and an asphalt saw (or selecting a specific model for your skid steer) involves evaluating your job requirements and the equipment capabilities. Here are key considerations and tips for selection:
- Job Material and Difficulty: Start by assessing what you will cut most often. If your work primarily involves cutting or trenching through solid rock, reinforced concrete, or other extremely hard substrates, a heavy-duty rock saw attachment (with a large diamond blade or carbide rock wheel) is the appropriate choice – it’s built for those stresses and will cut faster and last longer in hard material. On the other hand, if your main tasks are road repairs, asphalt patching, and shallow utility cuts in softer ground, an asphalt saw (road saw) attachment may be more efficient and cost-effective. Asphalt saws are optimized for asphalt’s abrasiveness and typically have faster cutting speeds in that medium. They may also handle cutting through road base materials well (which often include gravel and compacted soil). For mixed-use – e.g., a municipal public works department that might cut both asphalt and occasionally concrete – look for a versatile wheel saw that can accept different blades or tooth kits for different materials. Remember that using a lighter-duty pavement saw on hard rock continuously could wear it out prematurely, while using a heavy rock saw on primarily shallow asphalt might be overkill (slower to maneuver, more expensive upfront). Match the tool hardness to the material hardness for best results.
- Required Cutting Depth and Width: Determine the typical trench depth and width you need. If you never need to cut deeper than say 8–10 inches, you might not need the largest rock saw – a smaller model (which is cheaper and easier to run) could suffice. For example, many cable or fiber optic line installations only require a narrow 6–8″ deep trench; a compact pavement saw attachment with a 9″ depth capacity would work fine. Conversely, if you need to install sewer lines or electrical conduits 18–24 inches deep under pavement, you’ll need an attachment rated for those depths (e.g. a rock saw model with a 24″ cut depth). Cutting width is also vital – some jobs (like laying pipe) might require a 4–6″ wide trench. Not all attachments can cut that wide in one pass; you may need either a wider wheel option or plan for multiple passes. Some manufacturers offer different wheel widths as options (2″, 4″, 6″ etc.). If you foresee varying width needs, consider an attachment where swapping wheels is relatively easy or where multiple wheel assemblies can be purchased for flexibility. However, note that wider wheels also demand more power.
- Skid Steer Hydraulic Capability: Your skid steer’s hydraulic flow and pressure output is probably the most important factor. Check the GPM of your loader’s auxiliary hydraulics (and if it has high-flow). Then look at attachments that can operate in that range. For instance, if your skid steer outputs 26 GPM at 3,000 PSI, you should look for wheel saw attachments with a similar requirement – many “high-flow” attachments list a minimum like 25–30 GPM. Using an attachment that ideally wants 40 GPM on a 26 GPM machine will result in underperformance. In such a case, either upgrade the skid steer or find a smaller attachment that can run on standard flow (there are a few that run ~20–25 GPM). Keep in mind also the hydraulic horsepower (which is pressure × flow); two attachments might both say “25–40 GPM, 3000 PSI” but a larger one will simply perform sluggishly on the lower end of that. Always best to have some headroom – e.g., if attachment needs 30 GPM, have a machine that can do a little more, not just barely 30. Don’t forget the case drain: if your machine lacks one, either choose an attachment that doesn’t require it or see if a case drain kit can be added to your loader. Running without required case drain is a non-starter.
- Skid Steer Size and Configuration: The physical size and type of your skid steer matter. Track loaders are recommended if available, for improved stability and traction. If you already have a wheeled skid steer, you can certainly still use these attachments, but you might opt for slightly smaller/lighter attachments to maintain better balance. Check the weight – your loader should handle the weight plus have enough counterweight so that when the saw is extended laterally, the machine isn’t at risk of tipping. If you run a very large saw on a barely-sufficient loader, you might find yourself pulled to one side or the back end lifting in some scenarios. It could also strain the lift arms over time. A tip: if you’re near the limits, consider adding rear counterweights or using a heavier 4-in-1 bucket on the front when the saw is not attached (as a balance) – although normally you won’t have a bucket together with the saw, obviously, but some folks rig weights on the back of the machine for stability. Ensure your tire condition or track condition is good too – poor traction will make trench cutting difficult (the machine might spin tires instead of moving forward through a tough cut).
- Attachment Features – What Do You Need?: Look at the features offered and decide which ones are important for your use. For example, does the attachment have a hydraulic side-shift? This is almost essential if you need to cut close to structures, but if you’re always cutting well away from obstructions (like middle of open road), a fixed model might be okay (though most have side-shift now). Depth control: some smaller saws might have manual depth stops vs. full hydraulic depth cylinders – the hydraulic ones are much more user-friendly and precise, so prefer those for efficiency. If dust control is a concern, see if the model has a water kit or at least the ability to add one. For frequent asphalt work, an integrated trench cleaner can save you cleanup time by clearing the groove as you go. Ease of maintenance is another consideration – check how easy it is to replace teeth or blades, whether common parts like hoses or filters are standard, etc. Some brands may have proprietary parts that are costly; others use generic picks available from multiple sources. Also consider support and parts availability: since these are high-wear tools, you’ll want to easily get replacement blades, teeth, or motor parts. Choosing a model from a well-known attachment maker or one that a local dealer supports can make maintenance smoother.
- Budget and Frequency of Use: These attachments can be expensive investments. If you only have an occasional need for asphalt cuts (say a few times a year), you might consider renting a wheel saw attachment or even using a walk-behind saw for small jobs, instead of purchasing. However, if you have regular work that justifies it, the productivity gains are significant – e.g., a skid steer rock saw can cut many feet per hour of trench that would take much longer with handheld saws and jackhammers. Evaluate the return on investment. Sometimes the choice between models might come down to cost vs. durability: a lighter-duty saw might be cheaper but could wear out faster if pushed to heavy use. If you foresee scaling up your operations (taking on bigger projects), it might be wise to invest in the heavier model upfront. Conversely, if you’re a smaller contractor, an entry-level pavement saw might fit your current project scope and you can upgrade later as needed.
- Demonstration or Case Studies: If possible, watch the attachment in action (many dealer websites have videos, or they can demo). Seeing a rock saw cut through a concrete slab vs. an asphalt saw doing a road cut can illustrate differences in speed, cut quality, etc. Pay attention to cut cleanliness – rock saws with diamond blades leave very clean edges (important if that matters for your project), whereas a tooth-style wheel might leave a slightly rougher edge but remove material faster. Decide which outcome is more important for your work. For instance, if you’re a fiber optic installer who will immediately cover the trench, edge precision might not matter as much as speed; if you’re cutting decorative concrete where appearance of the cut edge matters, a diamond saw’s smooth cut might be preferable.
- Future Versatility: Finally, think of how you might use the attachment beyond the immediate job. A rock saw attachment is generally more versatile (can cut anything from asphalt up to hard rock) given the right blade, but requires the capable machine to run it. An asphalt saw might struggle or simply be ineffective in hard rock (leading to frustration or breakage if misused). If you anticipate varied tasks, leaning toward the more heavy-duty, versatile option can pay off (you can always throttle down for easier jobs, but you can’t exceed the limits on a light-duty tool for a hard job). Just be sure it’s not too oversized for your skid steer.
In summary, choose a rock saw attachment when you need maximum cutting power and depth for hard materials and have a skid steer that can handle it. Opt for an asphalt/pavement saw attachment when your main tasks involve shallower cuts in roadways and you value speed and maneuverability. Both types significantly enhance a skid steer’s capabilities, effectively turning your loader into a mobile saw unit for trenching and cutting. By considering the points above – material, depth, machine hydraulics, and job requirements – you can select the attachment that best fits your needs and ensures productive, safe operation on the job site. A well-chosen attachment, paired with a properly equipped skid steer, will become a go-to tool that saves time and labor on projects ranging from utility installations to road maintenance.